AI Page Assistant
The AI Page Assistant uses natural language descriptions to automatically generate professionally laid-out, fully featured industrial monitoring pages, HMI operation pages, and data dashboards. Users can explicitly choose to generate a single page only, or a complete system containing multiple pages and page navigation. For pages such as production line overviews and process monitoring pages, it can also generate process flow diagrams that reflect process relationships. When saved, these diagrams are converted into editable CMS equipment images, pipes, labels, and measurement point components. Generated pages can be previewed, fine-tuned, saved as CMS pages, and combined with Smart Binding to connect tags. Its core purpose is to rapidly complete engineering development for monitoring pages.
Feature Description
- Multi-modal Input for Page Construction: Supports describing a page via natural language: "theme (purpose), visual style (optional), and core content (data/elements to be displayed)", as well as uploading requirement attachments or reference images, selecting page templates, and selecting asset resources. The AI generates pages based on the templates, images, and asset information.
- On-Demand Generation with Two Modes:
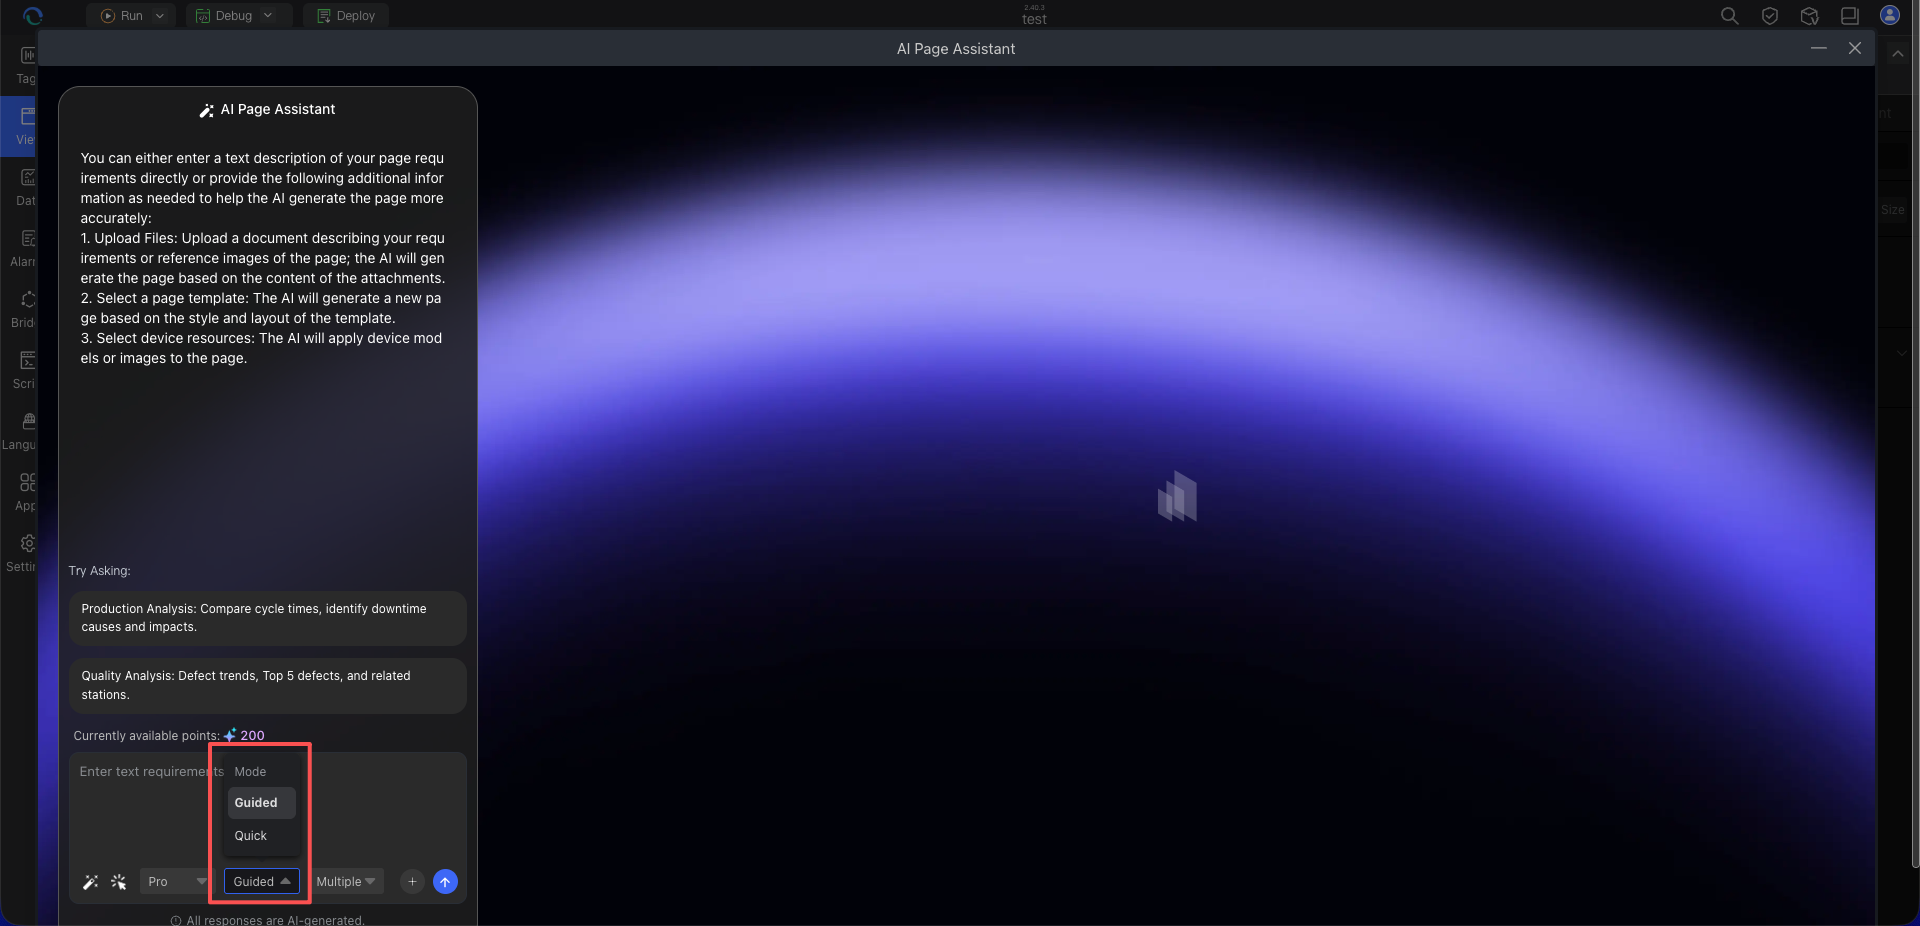
- Quick Mode: The AI intelligently fills in missing contextual details, providing a fast page generation experience. Suitable for rapid ideation, concept validation, and prototype exploration during the early stages of a solution.
- Guided Mode: Based on visual card interactions, the AI intelligently guides users to complete configurations and provides a plan confirmation and adjustment step before generation, ensuring that the delivered result aligns precisely with business intent. Suitable for engineering delivery scenarios with strict standards and clear requirements.
- Controllable Generation Scope: Before generation, you can select Single Page or Multiple Pages. Single Page generates only one main page, with faster generation and lower consumption, making it suitable for quick trials, solution validation, or extending pages in an existing project. Multiple Pages can generate one or more pages and page navigation based on the requirements, making it suitable for building a complete system. The generation scope is locked after the first requirement is sent, preventing the AI from misjudging the number of pages because of terms such as "system", "platform", or "console".
- Multi-type Page Generation: Based on user requirements, the AI Page Assistant can mix and match four major component types—charts, controls, displays, and statuses—to generate pages. It supports analytical dashboards, HMI, reports, and composite pages that combine multiple component types.
- Process Flow Diagram Generation and Component Conversion: When users explicitly request a "process flow diagram", "production line overview", or "process monitoring" page, the Page Assistant can identify the industry, process, equipment, pipes, media, and flow directions, generate a process flow diagram, and apply it to the page. When saved to CMS, the diagram can be further broken down into editable components such as equipment images, pipes, text labels, and measurement point placeholders;
- Asset Reference: When generating a page, you can directly reference user-selected asset resources, including equipment images, 3D models, and more.
- Intelligent Local Regeneration: Supports fine-grained adjustments to generated pages. Users can freely select specific areas on the page and use natural language instructions to drive the AI to quickly perform targeted regeneration and style optimization of local components.
- Seamless Integration with the Production Environment: Generated pages cover real-time data display (such as current, voltage, and production count), equipment status feedback, control and interaction elements, and asset resource display. They can be saved from the HTML preview and converted into CMS page components. Engineers only need to make simple adjustments based on actual engineering requirements, such as component positions, colors, and tag binding confirmation, before putting them into use.
Core Advantages
1. Leap in Engineering Efficiency
The design cycle for monitoring pages is shortened from traditional "hours" to "minutes", significantly accelerating engineering delivery.
Efficiency Comparison:
| Page Type | Traditional Development | AI Generation | Credit Cost | Efficiency Improvement |
|---|---|---|---|---|
| Simple monitoring page (10-20 components) | 2-3 hours | 3-5 minutes | 20 credits/time | 95% improvement |
| Standard dashboard (30-50 components) | 4-6 hours | 5-10 minutes | 20 credits/time | 96% improvement |
| Complex large screen (50+ components) | 1-2 days | 10-20 minutes | 30 credits/time | 97% improvement |
Calculated based on labor costs, the value of saving one hour of development time far exceeds the cost of 20 credits. AI generation not only improves efficiency but also significantly reduces project costs.
2. Zero-Barrier Development
OT engineers do not need to master UI design or front-end development skills. They can complete professional page development simply by describing requirements in natural language.
Traditional Approach vs. AI Approach:
Traditional Approach:
Learn UI design → Learn the component library → Manually drag and drop the layout → Adjust styles → Configure properties
Requires: Design ability + Technical ability + Significant time

AI Approach:
Describe requirements → AI generates → Simple fine-tuning
Requires: Ability to express requirements clearly
3. Consistent Page Style
Supports defining a unified design standard through "style prompts" (such as "dark tech style" and "card-based layout"). Reusing prompts in multi-page projects helps maintain visual consistency and reduces later adjustment work.
4. From Page Preview to Engineering Deployment
The AI Page Assistant does more than generate static visuals. It also supports converting components in the page preview into CMS native components and connecting them to Smart Binding. For HMI operation pages, display, control, and status components can enter the subsequent binding process, reducing repetitive configuration between the design draft and a runnable page.
Typical Scenarios
Scenario 1: Rapid Validation of Engineering Proposals
Background: During the project bidding phase, an interface prototype needs to be shown to customers, or a new dashboard layout needs to be reviewed internally.
Traditional Approach:
- Designer produces design draft: 1-2 days
- Developer implements prototype: 2-3 days
- Total: 3-5 days
AI Approach:
- Input requirements: "Create an overall production line dashboard, including OEE, production trends, and an equipment status list."
- AI generates a high-fidelity page: 5 minutes
- Fine-tuning and optimization: 10-20 minutes
- Total: within 30 minutes
Value: Facilitates rapid communication and iteration of engineering proposals, improving bid success rates.
Scenario 2: Quick Start for Complex Page Engineering
Background: Functional pages involving process calculations and multi-data processing need to be developed.
Strategy:
-
First, use the AI to generate the page "skeleton":
Create a recipe management page, including:- Left side: Recipe list (table)- Middle: Parameter input area (10 input boxes)- Right side: Real-time data display area (5 numeric displays)- Bottom: Save, load, and delete buttons -
The AI generates the basic layout and components
-
Engineers focus on backend logic and functionality implementation
Value: Reduces time spent on front-end layout, allowing engineers to focus on core business logic.
Scenario 3: Standardized Construction of Multi-Page Projects
Background: Several similar equipment monitoring pages need to be created for a production workshop.
Steps:
-
Before sending the first requirement, set the generation scope to "Multiple Pages"
-
Prepare a unified "style prompt":
Industrial gray style, highlight color is cyan, card-based layout,title font 18px, data font 24px bold -
Specify the page list in the prompt and include the unified style description:
Industrial gray style, highlight color is cyan, card-based layout,title font 18px, data font 24px bold.Create an injection molding workshop homepage and monitoring pages for Injection Molding Machines 1, 2, and 3,with each equipment page including temperature, pressure, cycle time, and production count,and add a navigation bar to the pages so that users can navigate between them -
Check the page count, page navigation, and visual consistency in the preview
Results:
- Most pages maintain consistent layouts, fonts, and colors
- Five pages are reduced from one day to one hour
- Reduced engineering standardization costs
Scenario 4: Rapid Generation of HMI Operation Pages
Background: Equipment operation pages need to include parameter display, status indicators, operation buttons, and alarm information at the same time. Traditionally, engineers must drag and drop components one by one and configure their styles.
AI Approach:
- Input requirements: "Generate an HMI operation page for an injection molding machine, including parameter monitoring, operation monitoring, system operations, current alarms, and a manual debugging area."
- The AI automatically mixes display, control, and status components
- After confirming the layout in the preview, save it as a CMS page
- Use Smart Binding to complete read/write tag binding
Value: Quickly builds an HMI page skeleton that can be further configured, reducing time spent on component selection, layout, and basic style configuration.
Scenario 5: Generation of Process Overview Pages
Background: Projects such as water treatment, hydrogen energy, air compressor stations, boilers, or cooling stations need to display equipment connections, pipe flow directions, medium colors, process sections, and key measurement points. Traditionally, equipment and pipelines must be drawn one by one.
AI Approach:
-
Enter the process relationships, or upload an existing process flow diagram as a reference:
Create a SCADA process overview page for a water treatment system.The process flow is: raw water tank → raw water pump → multimedia filter → activated carbon filter → clean water tank.Use blue pipes to represent raw water and clean water, and mark the flow directions.Display the liquid level of each tank, pump operating status, inlet and outlet pressure, and instantaneous flow,and add current alarms and a system start/stop operation area on the right. -
The AI identifies the equipment, main pipelines, media, flow directions, and measurement points, then generates the process flow diagram and the complete page
-
Check the process relationships, equipment positions, pipe colors, and flow directions in the preview
-
Save the page to CMS, where the process flow diagram is broken down into equipment images, pipes, labels, and measurement point components
Value: Reduces repetitive work from requirement analysis, equipment layout, and pipeline drawing to CMS component reconstruction for industrial process diagrams, quickly producing a process overview page that can be further configured.
5-Minute Quick Start
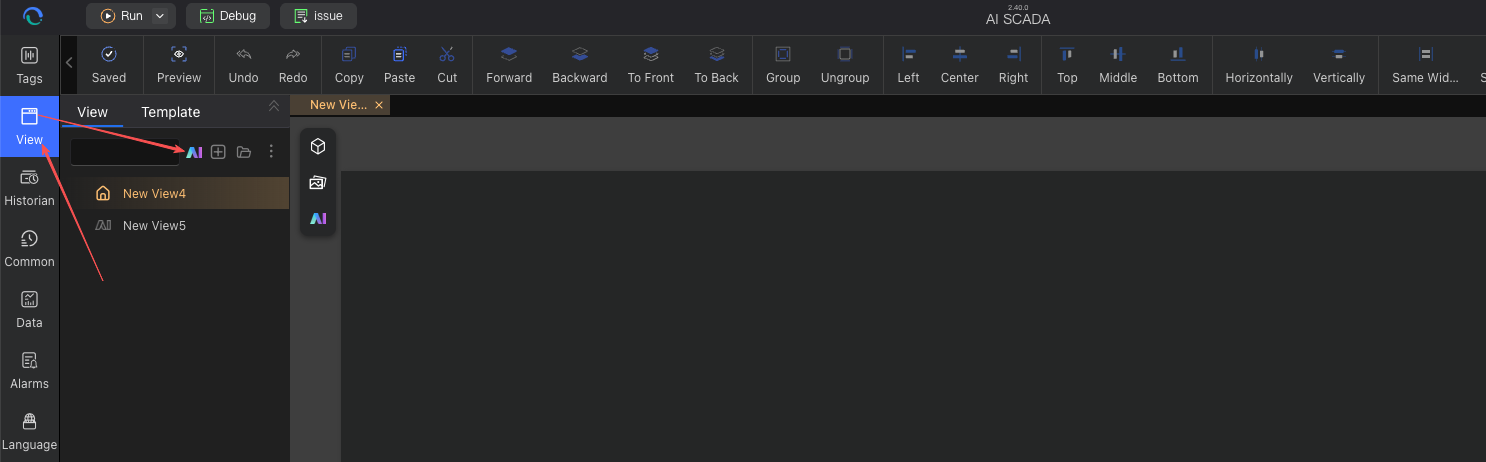
Step 1: Open the AI Page Assistant
In the page editor, click the "AI Assistant" button in the top-right corner, or select "AI Generation" when creating a new page.
Step 2: Specify the Generation Scope, Requirements, and Mode
Before sending the first requirement, select Quick Mode (the AI automatically fills in missing requirements) or Guided Mode (the AI asks questions through card interactions to supplement the requirements). Enter page requirements in the dialog, or upload a requirement attachment or reference image, select a page template, or select asset resources. For example:
Create an injection molding machine monitoring page in a dark tech style,
including:
- Real-time temperature curve chart
- Pressure gauge
- Production count display
- Equipment status indicator lights
- Start/stop buttons
Select a generation mode:
Then select the page generation scope:
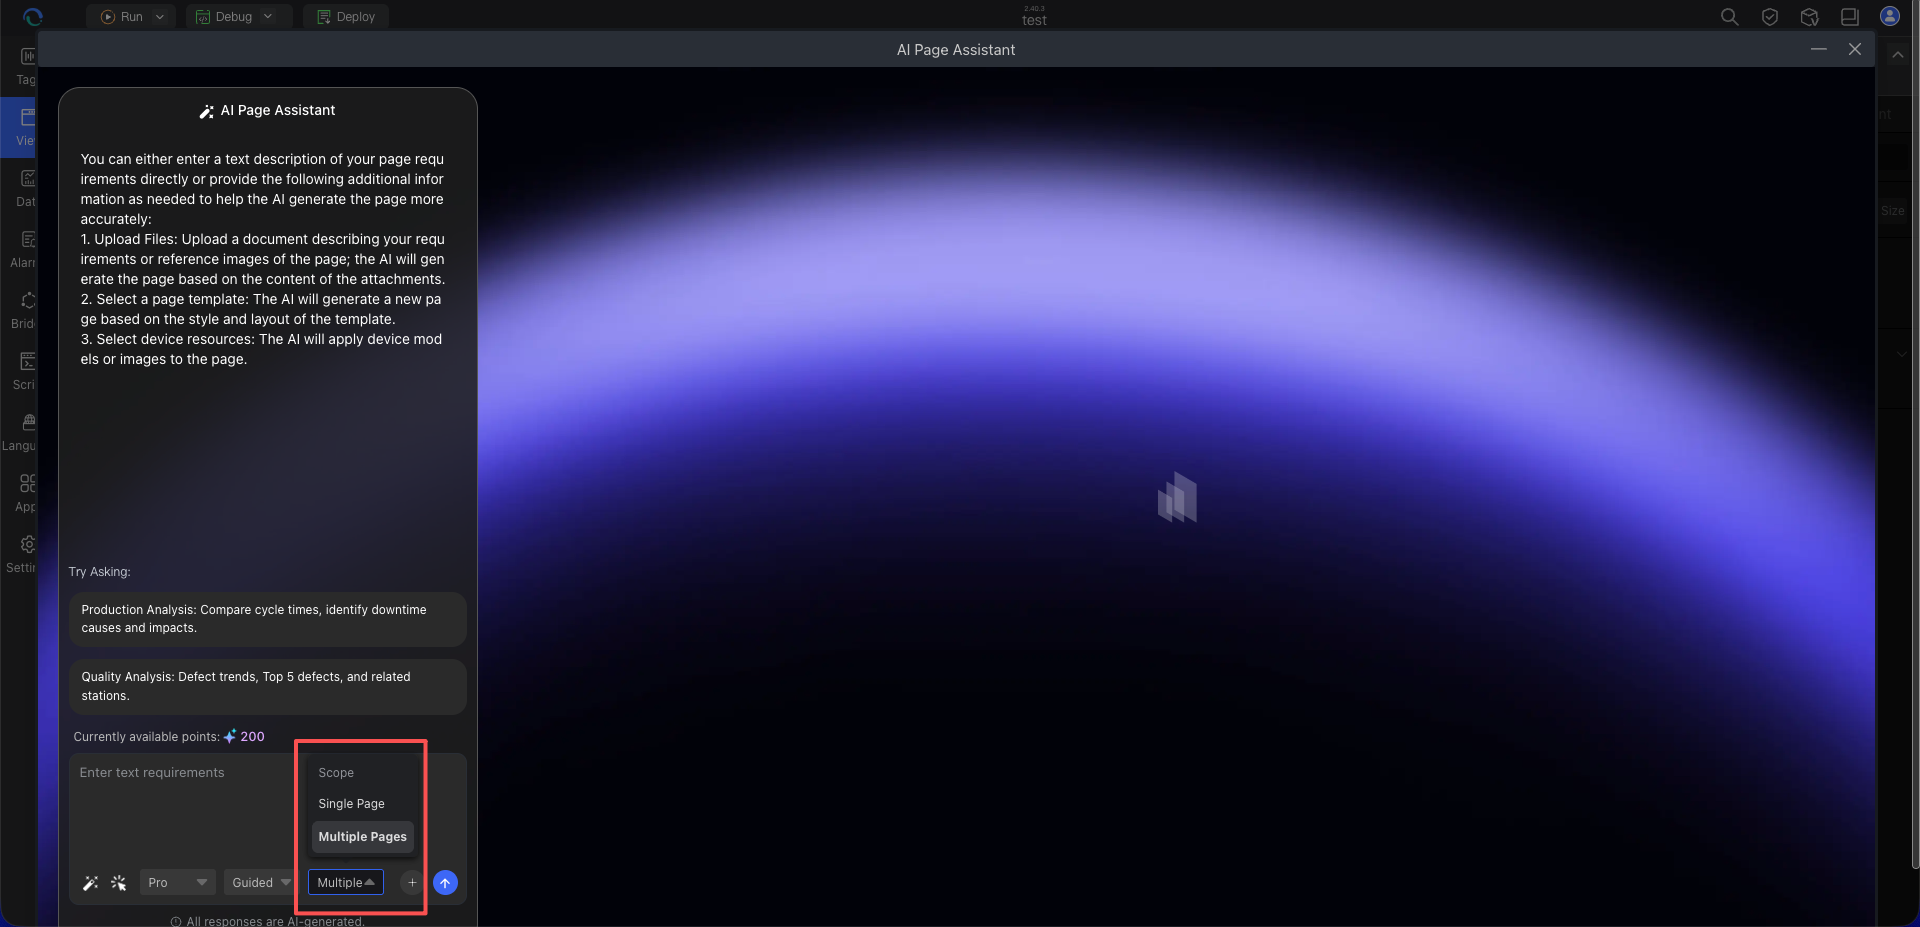
- Single Page: Generates only one main page, with faster generation and lower consumption. Suitable for quick trials, solution validation, or page expansion
- Multiple Pages: Generates one or more pages and navigation relationships based on the requirements. Suitable for a complete system
After the first requirement is sent, the generation scope for the current session is locked. To switch the scope, close the current window, start a new session, and make a new selection.
You can also upload a reference image or select equipment resources as needed:
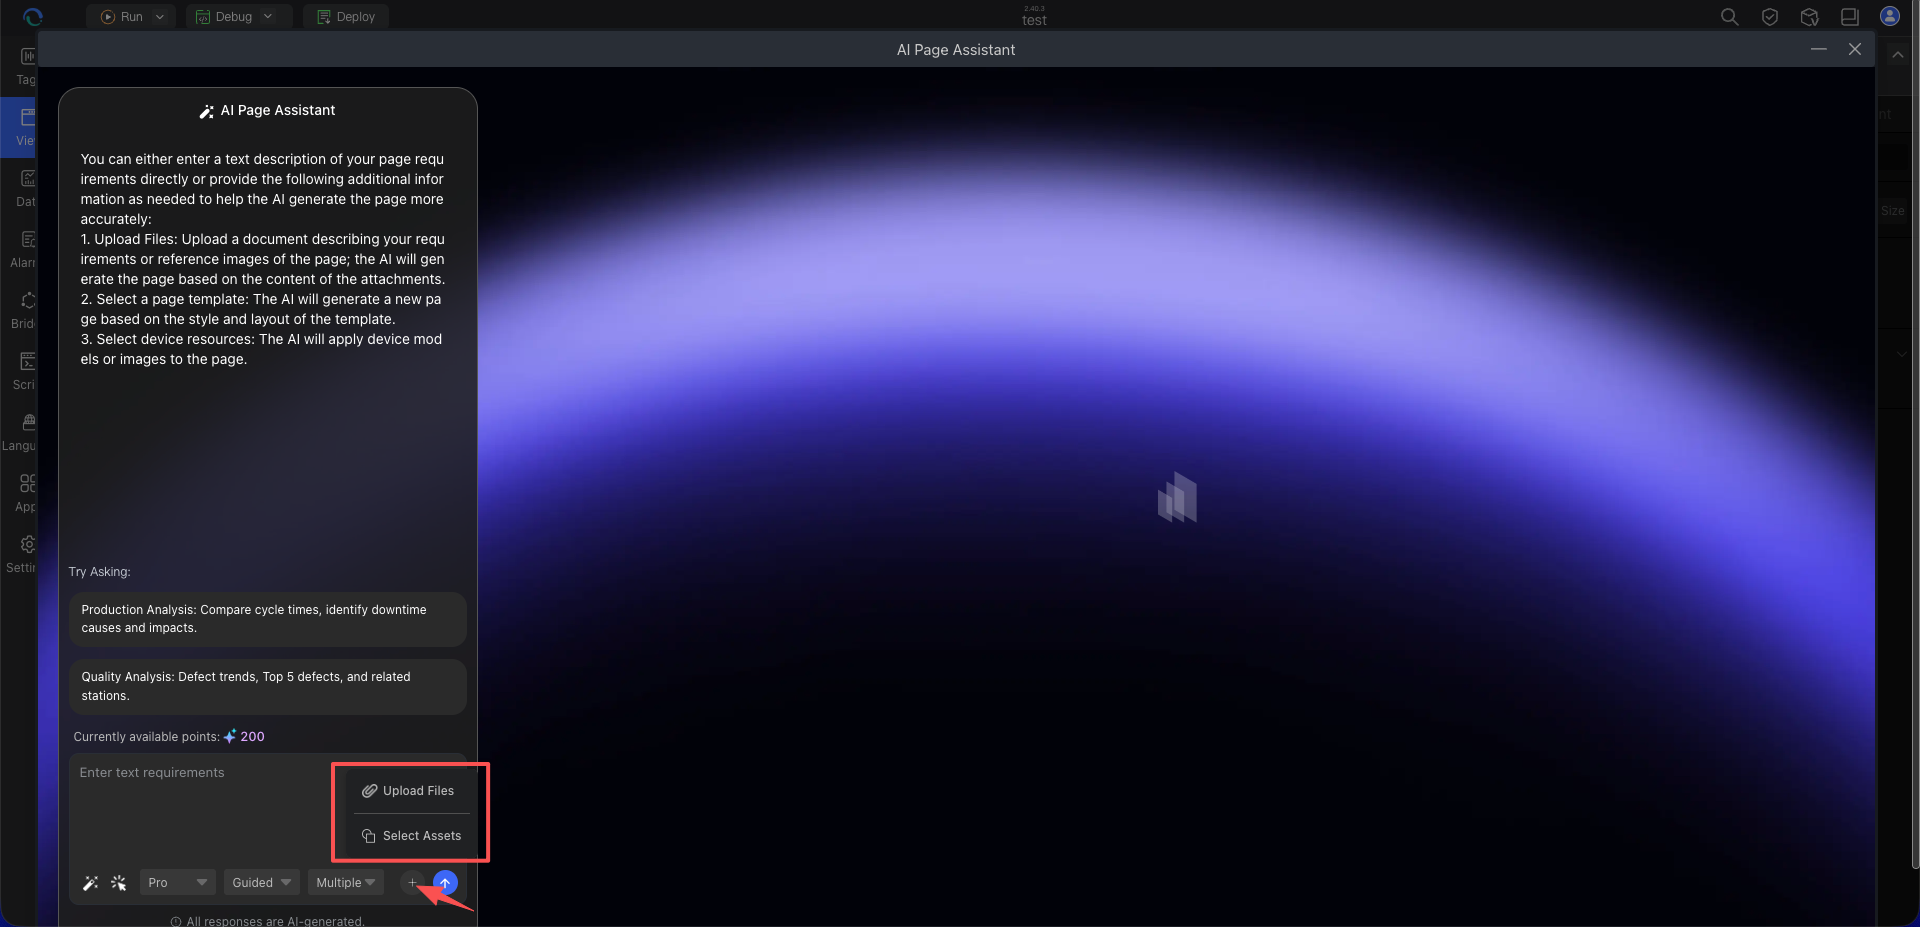
If you need to generate a process flow diagram, it is recommended to explicitly specify the process object, upstream and downstream equipment relationships, pipeline media, flow directions, key measurement points, and control areas in the requirements. You can also upload an existing P&ID, SCADA screenshot, or process schematic as a reference.
Step 3: Wait for the AI to Generate
The AI analyzes the requirements and generates the page within 30–60 seconds, displaying progress indicators during generation. If asset resources have been selected, the AI references them and creates the corresponding display areas on the page. When a process flow diagram is involved, the AI also identifies the process relationships, generates the diagram, and organizes the related status, control, alarm, and parameter areas. Please wait patiently according to the progress indicators.
Step 4: Preview and Fine-Tune
- View the generated page
- If adjustments are needed, you can:
- Select a specific area and ask the AI to modify it through conversation
- Select an asset resource area and ask the AI to adjust its position, size, or display method
- Or continue talking to the AI for overall optimization
Step 5: Save as a CMS Page
After confirming the preview, save the page as a CMS page. The HTML preview content on the page is converted into CMS page components that can be further edited. When a process flow diagram page is saved, the conversion progress is displayed, and the equipment, pipes, labels, and measurement points are broken down into CMS components. During conversion, the page and related buttons are temporarily unavailable.
Step 6: Smart Data Binding
Click "Start Smart Binding" to let the AI automatically match tags to components. See AI Smart Binding for details.
Prompting Tips (For Quickly Generating High-Quality Pages)
Tip 1: Basic Standard Page Generation Formula
Formula: Theme (page purpose) + Style (optional) + Core content (data/elements to display)
Example 1 – Simple monitoring page:
Create a monitoring page for a robotic welding station,
in a dark tech style,
including a real-time welding current chart, voltage curve, production count display, and equipment status indicator lights.
Example 2 – Production dashboard:
Create an overall production line dashboard,
with a card-based layout and blue theme,
including an OEE gauge, production trend line chart, equipment status list, and alarm message ticker.
Example 3 – Data analysis page:
Create an energy consumption analysis page,
in a light and clean style,
including a bar chart comparing daily/monthly/yearly energy consumption, a pie chart of energy consumption by equipment,
a real-time power curve, and an energy consumption ranking table.
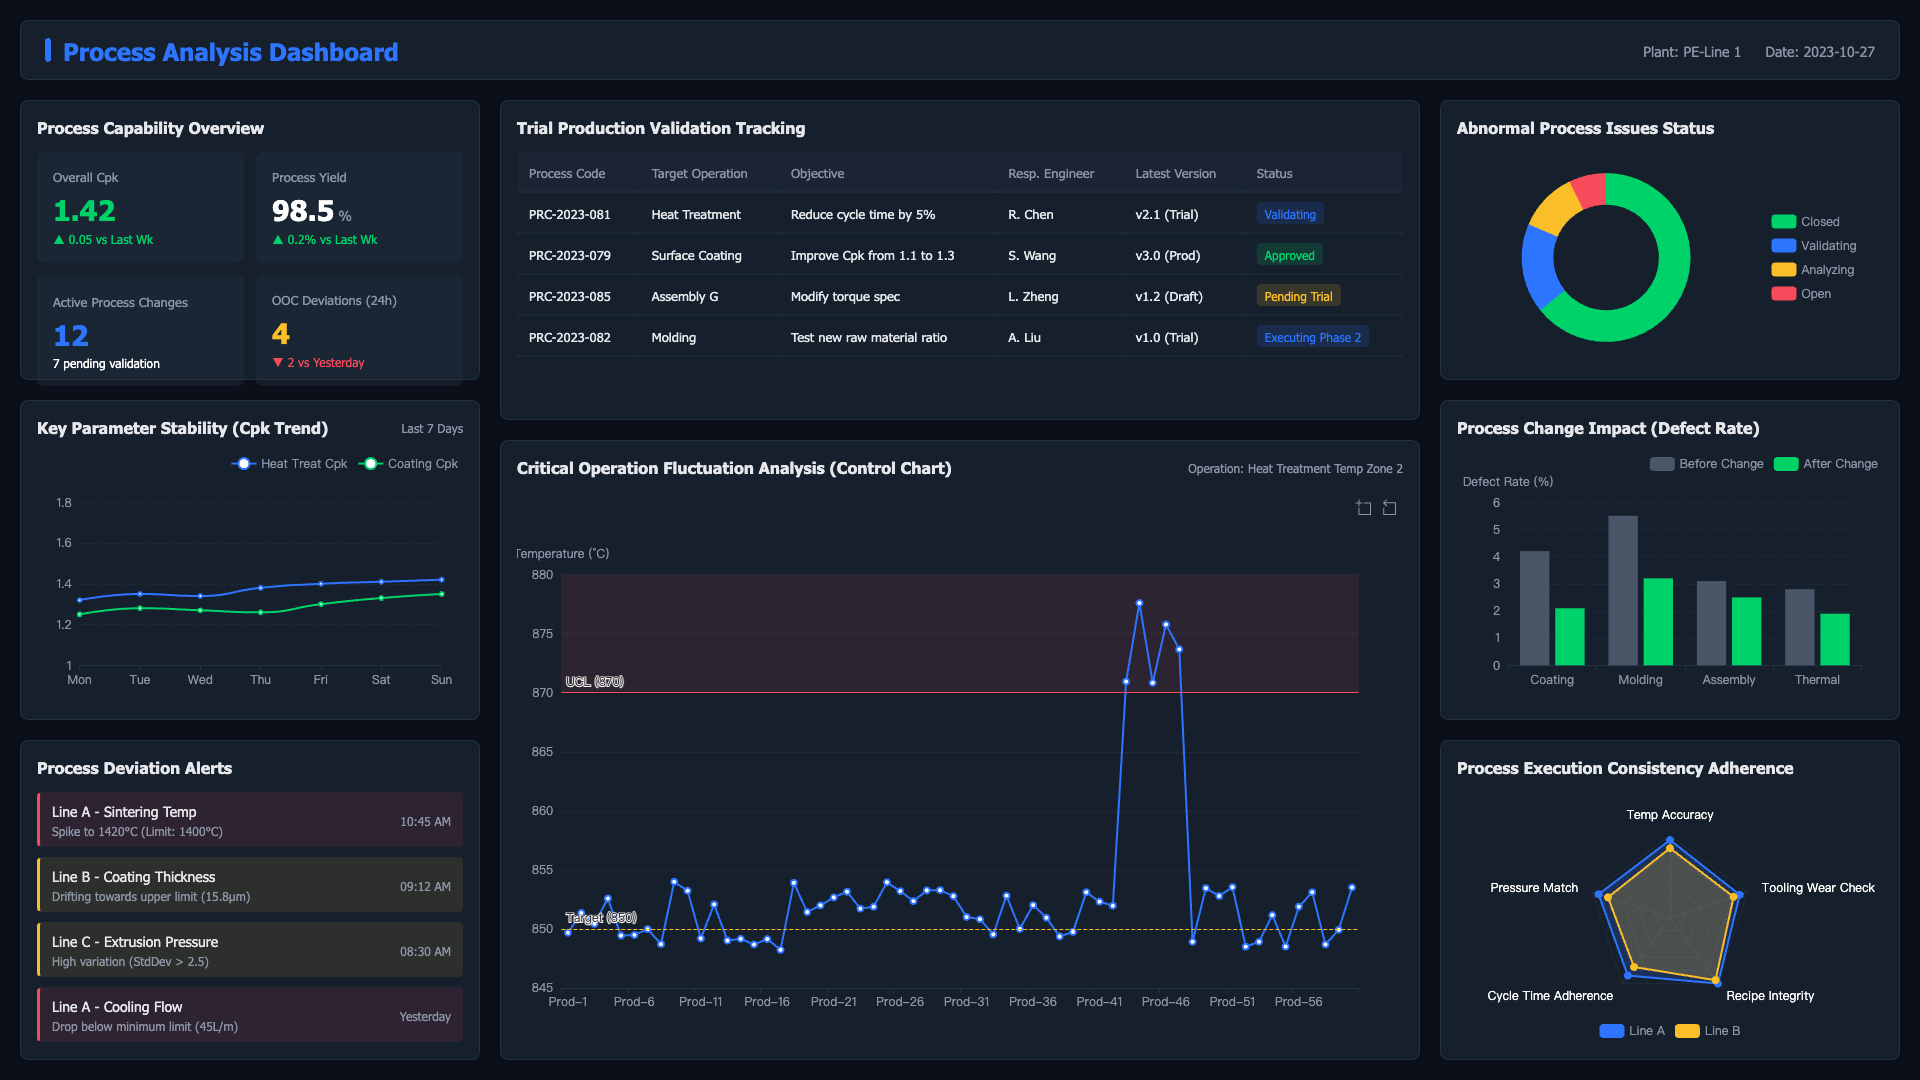
Tip 2: Large-Screen Custom Page Generation Formula
Formula: Theme + Style + Layout structure (screen zones) + Detailed elements (charts/data in each zone)
Example – 1920x1080 large screen:
Design a stamping machine monitoring page for a 1920x1080 screen,
in an industrial gray style with orange as the highlight color;

The page is divided into three columns: left, center, and right:
- Left (width 30%): Display OEE with a gauge, with equipment status cards below
- Center (width 40%): Display the equipment name at the top, a real-time pressure curve with a line chart in the middle,
  and current work order information at the bottom
- Right (width 30%): Display historical fault records in a table, with a maximum of 10 records

Use Microsoft YaHei for all text, with an 18px title and 24px bold data text.
Tip 3: Use a Reference Style
If you have a preferred page style, you can describe the reference object:
Create a page similar to the Tesla factory monitoring style,
with a minimalist black-and-white color scheme and a strong tech feel,
including selected equipment resource displays, real-time data flow effects,
and large-number displays for key metrics
Tip 4: Generate an HMI Operation Page
Formula: Equipment object + HMI functional areas + Read/write components + Status and alarm requirements
Example – HMI operation page:
Create a 1920x1080 HMI operation page for an injection molding machine,
in a dark industrial style,
including parameter monitoring, operation monitoring, system operations, current alarms, manual debugging, and parameter settings.

Display real-time values such as temperature, pressure, speed, and production count in parameter monitoring;
Include start, stop, reset, clear, and alarm acknowledge buttons in the system operations area;
Use indicator lights in the status area to show running, stopped, and fault states;
Include input boxes for the temperature setpoint and speed setpoint in the parameter settings area.
Frequently Asked Questions
Q1: What if the AI-generated page does not meet expectations?
A: You can try:
- Redescribe the requirements: Use more specific and clearer language
- Generate step by step: Generate the basic layout first, then gradually refine it
- Provide references: Describe a similar page style or reference object
- Fine-tune manually: Make manual adjustments based on the AI-generated page
Q2: How can I maintain a consistent style across multiple pages?
A:
- Describe the style requirements in detail during the first generation
- Save this "style prompt"
- Reuse the same prompt when generating subsequent pages
- Modify only the specific content while keeping the style description unchanged
Q3: Can components generated by the AI be modified?
A: Absolutely. If you are not satisfied with the generated page, you can select a specific area and ask the AI to modify it directly through conversation. In addition, pages generated by the AI are standard CMS pages, so you can also manually:
- Drag and drop to adjust component positions and sizes
- Modify component properties (colors, fonts, styles, etc.)
- Add or remove components
- Modify data bindings
Q4: Can generated pages be saved as templates?
A: Yes. Generated and optimized pages can be saved as templates for reuse in subsequent projects.
Q5: Does the AI support generating mobile pages?
A: Yes. When describing the requirements, specify "mobile" or "phone" and provide the screen size. The AI generates a page layout adapted for mobile devices.
Q6: Does the AI support generating HMI operation pages?
A: Yes. You can clearly describe the required functional areas and component types, such as parameter monitoring, operation monitoring, system operations, manual debugging, parameter settings, and alarm records. The AI combines display, control, and status components based on the requirements to generate a page that can be further converted and bound.
Q7: How do I add asset resources to a generated page?
A: When entering the requirements, use "Select Assets" to choose the resources to reference, such as equipment images and 3D models. The AI applies the selected asset resources to the generated page.
Q8: What is the relationship between the HTML preview and a CMS page?
A: The AI first generates a previewable page. When you confirm and save it as a CMS page, the page content is converted into CMS native components. After conversion, you can continue editing component properties, adjusting the layout, and using Smart Binding to complete tag binding.
Q9: When is a process flow diagram generated?
A: The AI generates a process flow diagram when you explicitly request a process flow diagram, production line overview, or process monitoring page; select a page type such as an HMI operation interface or SCADA configuration overview; or describe upstream and downstream equipment connection relationships. A process flow diagram is not forcibly added to an ordinary dashboard or a page without process relationships.
Q10: Can a process flow diagram still be edited after it is saved?
A: Yes. When saved to CMS, the system attempts to convert equipment, pipes, labels, and measurement points into independent components so that their positions, styles, and data bindings can be adjusted. It also retains the complete process flow diagram as a fallback background. After saving, manually check the equipment connections, pipe flow directions, medium colors, and component conversion results.
Q11: How do I control whether one page or multiple pages are generated?
A: Select the generation scope before sending the first requirement. When "Single Page" is selected, the AI generates only one main page even if the requirements contain multiple pages, prioritizing the homepage, overview, large screen, workbench, or the most representative business entry point. When "Multiple Pages" is selected, the Page Assistant can generate multiple pages and page navigation based on the requirements. The generation scope is locked after the first requirement is sent. To switch it, close the current window and start a new session.
Best Practices
1. Start Simple, Then Go Complex
When using the assistant for the first time, start with simple pages to become familiar with the AI's capabilities and style, then attempt more complex pages. This allows you to get started quickly and avoids wasting credits on complex requirements.
2. Build a Prompt Library
Save commonly used and effective prompts to build a team prompt library and improve overall team efficiency.
3. Confirm the Generation Scope Before Sending the First Requirement
Select Single Page when quickly validating one page. Select Multiple Pages when you need a complete system, multiple functional modules, and page navigation. The generation scope is locked after the first requirement is sent, so confirm it before submitting the requirements to avoid additional waiting time and credit consumption caused by an unexpected page count.
4. Make Good Use of Iterative Optimization
If the first generation is not satisfactory, continue the conversation with the AI to make adjustments. However, note that each conversation consumes 20/30 credits. It is recommended to:
- Describe the complete requirements as clearly as possible in the first attempt
- If adjustments are needed, specify all modification points at once:
"Please make the following adjustments:
1. Change the chart on the left to a gauge
2. Add an alarm message ticker
3. Change to a dark theme"
- Avoid multiple separate modifications to save credits
5. Combine with Smart Binding
After the page is generated, immediately use AI Smart Binding to complete tag binding and achieve end-to-end rapid development.
6. Test and Validate
Before putting a generated page into production, be sure to validate it in a test environment:
- Check the layout at different resolutions
- Verify that data bindings are correct
- Verify that control-type components are bound only to the correct writable tags
- Check that referenced asset resources are displayed correctly at runtime
- For process flow diagram pages, verify that upstream and downstream equipment relationships, main pipelines and branches, medium colors, flow directions, and key measurement points comply with the actual on-site process
- Check that the equipment images, pipes, labels, and measurement point components created from the process flow diagram are complete, and that the fallback background of the complete diagram is displayed correctly
- Test that interactive functions work properly
Next Steps
- AI Tag Assistant - After mastering page generation, next learn about tag creation and point table import to prepare real data sources for page binding.
- AI Table Assistant - After tags are prepared, continue learning about historical archiving, statistical tables, and business data table configuration.
- AI Smart Binding - Once pages and tags are ready, learn how to quickly bind page components to tags.
- API Integration Assistant - When the page needs to display data from MES, ERP, or cloud platform interfaces, continue learning about API interconnection configuration.